04/06/2025
This guide aims to manipulate EPSON Receipt printers using Python, and thus generating custom receipts or tickets using a specific library. We will be using the TM-T20 as as example, though this guide should work with most EPSON printers using an ESC / POS command system.
We will first make sure that the machine is working properly :
- It must be plugged into a power source and be able to power on.
- It must contain a roll of properly installed thermal paper.
- It must be plugged in the computer through USB.
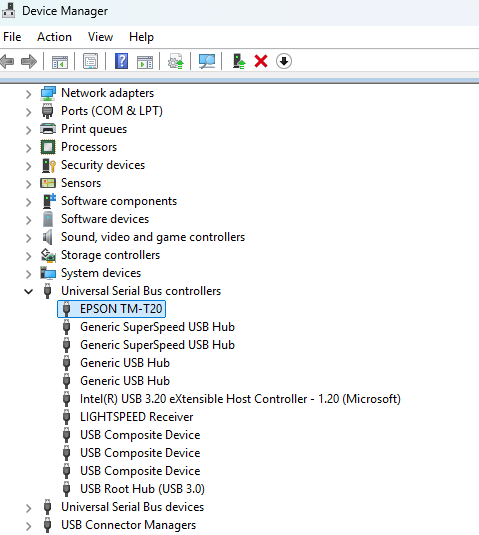
We will then open the Device Manager, where we should find the TM-T20 (or any target model) listed among the USB peripherals, thus confirming that the machine is recognised by Windows.
If Python isn't already installed on your computer, all you have to do is visit https://www.python.org/downloads/, and download the latest version. No extra options will be needed, so we can simply proceed through the installation wizard.
In order to establish a communication between Python and the printer, we must :
- be able to send data to the right place, specifically to a port assigned to the printer ;
- send data that will be understood by the printer (we will make use of a Python library)
We will be installing EPSON's Virtual Port Assignment Tool, available through this link. If the link doesn't work, we can check the complete software list for the TM-T20. For other models, check this listing, find your corresponding model, and find the virtual port tool in the software list (if it exists).
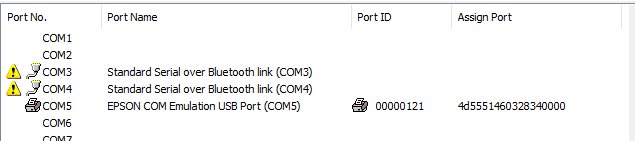
Once the tool is installed and opened, we will assign a port to our printer (COM5 for example), like in the image below (Select a free port -> Assign Port -> TM-T20 with USB -> OK)
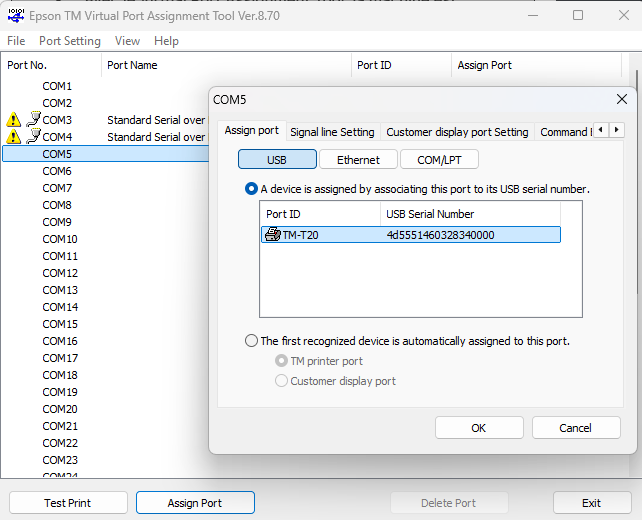
We can also print a test receipt using
Test Printto make sure the virtual port is behaving normally.
A virtual environment (or venv) is a sort of isolated Python instance that can have its own packages, libraries, etc, without affecting the global Python config. We will create a venv and execute our future scripts within that venv.
To do this, we begin by creating a folder somewhere in our PC (in this example, we placed it in D:\epson_receipts). We then open a terminal and input the following commands :
cd <path to folder>
# we go to the created folder, for instance D:/epson_receipts

py -m venv .venv
# we create a venv in our folder, it will be contained in a .venv folder

.\.venv\Scripts\activate.ps1
# we activate the venv using a powershell file in /.venv/Scripts
# the terminal header should now display (.venv)

pip install python-escpos
# we install a Python package in our venv that will be used to write and send instructions to the printer

pip install pyserial
# this package is necessary for Serial connections, which is our case here
We will keep this terminal open for later.
We open the Python IDLE that was automatically installed alongside Python (or any other IDE) :
We create an empty file with Ctrl + N, in which we write a little test script as following :
from escpos import *
# we import the entirety of the escpos library

""" Seiko Epson Corp. Receipt Printer (EPSON TM-T20) """
# we declare the printer model, for readability purposes

p = printer.Serial("COM5", profile = "TM-T20II")
# we assign the printer on our selected port to a variable named p
# we also declare the printer model as a parameter that will be verified in capabilities.json
p.set(align="center")
# we set an alignment that will apply to all following elements
p.text("Hello World\n")
# we add text - the line break matters
p.barcode('4006381333931', 'EAN13', 64, 2, '', '')
# we generate a barcode containing an arbitrary value
p.qr("https://example.com", ec=1, size=8)
# we generate qr code pointing to an example link
p.cut()
# we finish by cutting the receipt
We save the file, then we come back to our terminal and we execute the script in our venv :
python <path>\<file>.py
# make sure to be in the active venv
# the path to the script is required, for example :
# python D:\epson_receipt\receipt.py
Note that the file doesn't have to be in the same folder as the venv.
If everything goes well, we should obtain a receipt like this :

The complete listing of printing methods with python-escpos is available in the docs. We can look at the
setmethod in particular, it is used to set many styling options.
- python-escpos documentation
- python-escpos repository
- Zadig, a tool for replacing Windows drivers to libusb
- libusb for Windows
If the Python commands aren't being recognised by the temrinal, we can follow these steps :
- Access the Windows Environment Variables through the System Properties window
- Edit the
Pathvariable, then add a new path to the Scripts folder of your Python installation. By default, it should be located atC:\Users\[USERNAME]\AppData\Local\Programs\Python\Python313\Scripts - Confirm changes and restart the terminal, or the computer if necessary. The terminal should now respond to Python commands.